

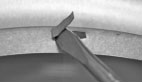
Bend Tabs Straight Up
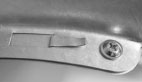
Flatten Tabs / Screw Secure
Tape Joints Along Flange
Assembly
 Click Here for Printable Instruction Sheet
- Bend all the tabs straight up with a flat screwdriver.
- Mate the two parts so that the screw holes line up.
- Secure the flanges with three sheet metal screws.
- Bend tabs down and tape the joints along the flange.
- Model LT45 should be measured as .75 feet against the total allowable duct length. See engineering information based on ASHRAE calculations and code references: 2012 IMC Table 504.6.4.1 and IRC Table M1502.4.4.1 for 10" radius fittings.
- Arrow indicates airflow direction from dryer and provides for proper male and female connections.
- For attic space installations, one LT45 can be used so the duct extends straight through a pitched roof.
- Two LT45s can be used in conjunction to complete a ninety degree turn running diagonally to shorten total run length.
- Tandem LT45s can be used to offset the duct run by six inches.